Wiresless Printing from ( via Wi-Fi/WPS ):
Windows (7 and newer)
Mac (10.9 and newer)
Linux
Android,iPhone,iPad ( Connect with "Elabel" App )
USB Wired Printing from:
Windows (7 and newer)
Mac (10.9 and newer)
Linux
Useful Reminder:
- WU550 not compatible with Chromebook at present.
- "Elabel" App is a label edit software. It can meet a variety of printing needs, whether for household or commercial usage.
Please note WU550 requires Wi-Fi/WPS wireless connection or USB wired connection.
REKDOM WU550 works like a regular printer and it will show "WU550 printer" in your computer after installed the
wireless driver software. It printing anything you send to it, just make sure that the loaded label, label page and printer
settings are all the same size.
Note: If a platform is not listed here, it doesn't mean it won't work with REKDOM. If you can get a 4 x 6’’label
from this platform, it will work with REKDOM.
Our supported:
. Amazon
· Etsy
· PayPal
· eBay
. Shopify
. Pirateship
· ShipStation
· Shippo
· ShippingEasy
· Poshmark
· EasyShip
......
WU550 printer works with direct thermal labels and prints labels in width (1.5'' to 4.25'') and in height (1'' to 9.84'').
Ideal for 4''x6''/4''x4''/4''x2''/4''x1''/3x3''/3''x2''/2.25''x1.25''/2x1'' labels.
Pls check below setup video for a quick start:
Step 1:
Pls ensure the printer is OFF.
Plug the power cord into the power adapter.
Plug the power adapter into the power interface on the back of the printer. Plug the other end of the power cord into a power outlet.
Connect the USB cable to your printer and plug the other end into your computer's USB port.
Step 2:
Load your labels from printer back and turn the power ON, the printer will detect the label automatically.
Note: The label paper which will print need facing the ceiling.
Step 3:
Insert the USB disk in the computer ->Windows->Double click “REKDOMWU550PrinterWindowsDriver.exe” driver software (same driver with Wi-Fi version) and click “Install” -> but choose “Usb install” and follow the prompt to finish the installation.
After installation, pls go to Start menu->Settings->Devices->Printers and scanners->You will see the “WU550 printer".
To verify your REKDOM WU550 was installed properly, go to “WU550 printer" ->Manage ->Printer Properties ->click “Print Test Page”. If you can print it, the driver software was installed correctly. You can also print a 4x6” sample label from our USB disk to verify.
Pls check below install video for a quick start:
Step 1:
Pls ensure the printer is off.
Plug the power cord into the power adapter.
Plug the power adapter into the power interface on the back of the printer. Plug the other end of the power cord into a power outlet.
Connect the USB cable to your printer and plug the other end into your computer's USB port.
Step 2:
Load your labels from printer back and turn the power on, the printer will detect the label automatically.
Note: The label paper which will print need facing the ceiling.
Step 3:
Insert the USB disk in the computer -> Mac ->Double click” REKDOM_WU550Printer_MacDriver.pkg “driver software (same driver with
Wi-Fi version) and click “Continue”->click “Install” and follow the prompt to finish the installation.
After installation, pls go to your Mac's settings->click “ Printers and Scanners” ->pls click “+” and select “WU550 Printer" and click
“Add”, and the WU550 Printer will be added.
To verify your Labelrange was installed properly, Enter 127.0.0.1:631 on your browser->click “Printers” ->click WU550 Printer from Queue Name, Select “Print Test Page” from Maintenance. If you can print it, the driver software was installed correctly. You can also print a 4x6” sample label from our USB disk to verify.
Pls always download the latest linux software from our website for the best result.
If our linux drivers not compatible with your system, contact customer support, thanks
Please check below setup video for a quick start:
For detailed instructions, please refer to the User's Manual.
Useful Reminder:
- Pls make sure the labels are properly loaded, with the printing side facing up (towards the ceiling).
- Ensure the printer is ON before connecting to Wi-Fi. We recommend customers use Mehod ONE ( by using the Wi-Fi password) to connect to Wi-Fi.
- If the network “FSC-BW236-AP” is not showing at first time, pls refresh it. If it is still not showing in 2minutes, turn the printer off and restart the process.
- Please wait for 15seconds after the network “FSC-BW236-AP” show up and then join it. It will be more stable to connect to Wi-Fi.
Note: You can use any smart device to configure if it can be connect to Wi-Fi network and has a brower. Like your desktop, laptop, iPad, iPhone, Android...Once one of your device was configured to Wi-Fi, your other devices will not need to be configured. But if you use desktop/laptop device, pls remenber to install the wireless driver software after connecting to Wi-Fi. If you do your business on iPad/iPhone/Android, you can do the print directly via "Elabel" App after connecting to Wi-Fi.
- Before installing the wireless driver software, pls ensure the printer is on and has been connected to Wi-Fi. Ensure that your device is on the same network with the printer. Otherwise, it will not showing IP address during the installing.
Pls check below setup video for a quick start:
For detailed instructions, please refer to the User's Manual.
Useful Reminder:
- Pls make sure the labels are properly loaded, with the printing side facing up (towards the ceiling).
- Ensure the printer is ON before connecting to Wi-Fi. We recommend customers use Mehod ONE ( by using the Wi-Fi password) to connect to Wi-Fi.
- If the network “FSC-BW236-AP” is not showing at first time, pls refresh it. If it is still not showing in 2minutes, turn the printer off and restart the process.
- Please wait for 15seconds after the network “FSC-BW236-AP” show up and then join it. It will be more stable to connect to Wi-Fi.
Note: You can use any smart device to configure if it can be connect to Wi-Fi network and has a brower. Like your desktop, laptop, iPad, iPhone, Android...Once one of your device was configured to Wi-Fi, your other devices will not need to be configured. But if you use desktop/laptop device, pls remenber to install the wireless driver software after connecting to Wi-Fi. If you do your business on iPad/iPhone/Android, you can do the print directly via "Elabel" App after connecting to Wi-Fi.
- Before installing the wireless driver software, pls ensure the printer is on and has been connected to Wi-Fi. Ensure that your device is on the same network with the printer. Otherwise, it will not showing IP address during the installing.
Pls check below video of how to connect to Wi-Fi:
For detailed instructions, please refer to the User's Manual.
Useful Reminder:
- Pls always download the latest linux software from our website for the best result.
- Pls refer the Linux install guide from our USB disk.
- If our linux drivers not compatible with your system, contact customer support, thanks
Pls check below setup video for a quick start:
For detailed instructions, please refer to the PDF file.
How to download and run the ELabel App on Android iPhone iPad.pdf
Useful Reminder:
- Pls make sure the labels are properly loaded, with the printing side facing up (towards the ceiling).
- Ensure the printer is ON before connecting to Wi-Fi. We recommend customers use Mehod ONE to connect to Wi-Fi.
- If the network “FSC-BW236-AP” is not showing at first time, pls refresh it. If it is still not showing in 2minutes, turn the printer off and restart the process.
- Please wait for 15seconds after the network “FSC-BW236-AP” show up and then join it. It will be more stable to connect to Wi-Fi.
Note: You can use any smart device to configure if it can be connect to Wi-Fi network and has a brower. Like your desktop, laptop, iPad, iPhone, Android...Once one of your device was configured to Wi-Fi, your other devices will not need to be configured. But if you use desktop/laptop device, pls remenber to install the wireless driver software after connecting to Wi-Fi. If you do your business on iPad/iPhone/Android, you can do the print directly via "Elabel" App after connecting to Wi-Fi.
- Ensure that your device is on the same network with the printer.
Ensure the printer is on before connecting to Wi-Fi.
If you're having trouble connecting WU550 printer to Wi-Fi using Wi-Fi password, here are some things to consider and try:
• Pls make sure the feeder button light will flash. If not, pls press and hold the feeder button of the printer again and release the button until you hear four beeps.
• You can use any smart device to configure if it can be connect to Wi-Fi network and has a brower. Like your Desktop, Laptop, iPad, iPhone, Android...Once one of your device was configured to Wi-Fi, your other devices will not need to be configured. But if you use desktop/laptop device, pls remenber to install the wireless driver software after connecting to Wi-Fi. If you do your business on iPad/iPhone/Android, you can do the print directly via "Elabel" App after connecting to Wi-Fi.
• If the network “FSC-BW236-AP” is not showing at first time, pls refresh it. If it is still not showing in 2minutes, turn the printer off and restart the process.
• Please wait for 15seconds after the network “FSC-BW236-AP” show up and then join it. It will be more stable to connect to Wi-Fi.
• Did you join the “FSC-BW236-AP” network successfully? Open the URL: 192.168.1.1 under “FSC-BW236-AP” network.
• If you cannot log onto URL: 192.168.1.1, turn the printer off and restart the process or change your device to configure.
• If you forget the network name and password, find the label on the bottom or side of your router. The label contains important information about your router, including the original network name (SSID) and password (key/passphrase).
• Ensure you have entered the correct network name(SSID) and password and the capitals are correct.
• Did the printer button flashing time out? The printer button light will continue to flash during the connection. If it doesn't connect successfully in that time, turn the printer off and restart the process.
If you're having trouble connecting WU550 printer to Wi-Fi using WPS, here are some things to consider and try:
• Is WPS enabled on your router? Verify the router supports the WPS feature:
1. Look on your router to see if it has a WPS button.
2. Go to the Network menu of your internet capable device to see if the WPS option is available.
• Keep the printer under good signal coverage of the router. It is better to keep in the same room and within 15meters.
• Did the WPS process time out? The WPS light will continue to flash and the router will search for printer for up to 2 minutes.
If it doesn't connect successfully, it will usually reset and you will need to press it again to try a new connection.
If problem is not solved, please contact customer support, thank you.
Check the following before installing the wireless driver software.
We recommend customers to get the latest driver software of the printer from our website for the best result.
1) Ensure the printer is on and has been connected to Wi-Fi.
2) Ensure your device is on the same network with the printer.
You can find the printer network infos from [Wi-Fi configure] label.
3)
For Mac users, remember to double click "Mac WiFi Aid" software after finish the driver installation.
For Windows users, remenber to choose "Network Install" during the installation.
Please refer to the User's Manual.
Press and hold the top feeder button until you hear one beep and then release.
The printer will learn the label automatically again.
- Ensure that your printer has connected to WiFi and ensure that you have installed the driver software correctly.
Pls check the setup guide video and user manual for the details.
- Pls close the VPN and firewall software if possible since they may stop the installation. After installation,
you can start them.
Print quality may be harmed by dust, foreign objects, sticky materials, or other impurities sticking to the print head or
printer. When the print head becomes dirty, print quality decreases or detection of paper declines, clean it as directed.
Notes:
• Before cleaning, turn off power and wait 2 to 3 minutes to cool down.
• To clean the print head, open the top cover and clean the print head with a cleaning pen or a cotton swab with diluted alcohol or isopropyl alcohol. Rub the center and both sides of the print head.
• When cleaning the print head, be careful not to touch the heating part as this may damage or scratch the print head.
• To clean the sensor, rubber roller and paper guide, remove the label roll and remove sticky objects or other impurities with a cotton cloth or swab with medicinal alcohol.
• After cleaning the parts, do not use the printer right away. Wait until the alcohol has fully evaporated and the printer is completely dry (1-2 minutes).
- Ensure you are using Rekdom's power cable/adapter and printer is on.
- Ensure you have installed the wireless driver software successfully as per our steps. Please refer to the Chapter 4.
- If you have re-installed the driver software, be sure to print to the same active printer name when printing. Like WU550 Printer(copy1), (copy2),...
- If you use multiple routers/networks, ensure your device is on the same network with the printer when you install the wireless driver software and when you printing the labels. Like if you have use network 1 to configure to printer but your device is on network 2, then it is wrong.
- If you did the WPS way to connect to Wi-Fi, since a few WPS routers may encrypt the Wi-Fi password, when you restart the printer, the printer cannot automatically obtain the router password and it will not connect to Wi-Fi. For this reason, use Method ONE to connect to Wi-Fi and install the driver software.
- The printer Wi-Fi configuration will change due to a new network environment. If your network changed, re-connect to the new network and re-install the driver software.
- Make sure that your labels are properly loaded. The label side which will print needs to be facing the ceiling.
- Ensure your label type is “Direct Thermal” label.
- Ensure you are using Rekdom's power cable and adapter.
- Be sure that you have installed the driver software correctly. Please refer to Chapter 3 and 4.
- Ensure that your label page size, label paper size and printer settings are the same size.
On Windows:
Go to the Control Panel > Devices and Printers > Right click on WU550 Printer > Printer Preferences > pls choose
paper size. Or go to Start menu > Settings > Devices > Printers and scanners > WU550 Printer > Manage >
Printer Preferences to set up size or other settings.
On Mac:
Access these settings directly from the print menu and choose paper size.
- The most possible reason is that your label page with 8.5x11'', not 4x6''.
If you are printing 4x6" from these platforms like Amazon, eBay, Shopify, Paypal, Poshmark, Pirateship, Shipstation, Shippo... change your label size setting to 4 x 6 before you print. If you cannot figure it out, contact customer support or search the related video from Youtube, thank you.
By default, Some platforms produce labels in an 8.5 x 11 size at present which won't fit 4x6'' correctly. Like USPS, UPS, Mercari ...
If you print a few per day, we recommend our customers crop the label.
Like a USPS label from USPS website, choose PDF instead of Print Label > open with Adobe Reader > Choose Edit > Take a Snapshot > Select/Highlight the label's area > Right click in the highlighted area and select Print (choose 4x6'' as paper size), then it will be printed perfectly.
If you are printing many per day, we recommend our customers use shipping platforms like Shippo, Pirateship...you can print 4x6'' label directly and get discounted shipping cost.
- Make sure that loaded label, label page and printer settings are all the same size. Like if your shipping label page with 8.5x11'' and you use 4x6'' label for printing, it will print incorrectly.
On Windows:
Go to the Control Panel > Devices and Printers > Right click on WU550 Printer > Printer Preferences > pls choose
paper size or go to Start menu > Settings > Devices > Printers and scanners > WU550 Printer > Manage >
Printer Preferences to set up size or other settings.
On Mac:
Access these settings directly from the print menu and choose paper size.
- Make sure the paper guides are flush against the label with no gap.
- Learn about the label when it won't auto detect the label size: Press and hold the top paper feeder button until you hear one beep and then release.
You can use the USB cable that is included in the box and you need to install the driver software.
Pls see the USB install guides: www.rekdomprinter.com ->SUPPORT -> Setup guide -> USB install guide.
It will take you 2minutes.
You can also contact Rekdom customer support by phone or email to refund the difference, thank you.
- Open printer cover to check if anything is stuck on. Remove it and clean.
- Set your print speed to "5" and density to "4" and try your print again.
- Pls help do the Restore factory setting and Lack paper learn setting via TOOL software. You can find the detailed instructions from our website.
Pls check below video for a quick start:
For Labeldesigner software, please always download the latest version from our website.
It is a label edit software, not a shipping platform. It can meet a variety of printing needs, whether for
household or commercial usage.
Not for Mac users and Linux users.
- WU550 printer with direct thermal technology and its printing quality not as good as laser/inkjet printer. All thermal label printers with 203DPI resolution are the same.
- Printing quality of the label depends on the label manufacturer. Avoid poor quality labels as they can have bad printing performance.
- Ensure your label page content takes up the whole label. If there are extra borders, your design may be "shrunk" printed in a smaller size resulting in bad content.
- Open your printer to check if anything is stuck on. Remove it and clean. Regularly clean print head/rubber roller.
- For Windows users, please open the label with Adobe Reader and pls select " print as image" under "advanced" option. The printing effect will be better.
- Pls always download the latest driver software of the printer from our website for the best result.
- Ensure the printer cover was closed correctly.
- Open printer cover to check if anything is stuck on. Remove it and clean.
- The printer will beep when the printer is on but without labels. You can disable the beeping via TOOL software. You can find the detailed instructions from our website.
- Pls help do the Lack Paper Learn setting via TOOL software, you can find the detailed instructions from our website.
Step 1:
Pls ensure the printer is ON.
Connect the USB cable to your printer and plug the other end into your computer's USB port. (Note: Tool Software need run and work
base on USB connection, pls remember to connect the USB cable before setup.)
Step 2:
Pls download the Tool Software. Go to www.rekdomprinter.com -> PRODUCTS -> Thermal Label Printer->
WU550 Wireless Label Printer -> DOWNLOADS-> Tool Software-> If you use Mac system, then download Mac Tool Software and if you use Windows, then download Windows Tool Software.
Step 3:
1. Open Tool Software file ->Double click below tool column:
Pls click “WU550 Printer” and click "Connection Test", and it will showed “Connection Successful”. Then click " Set Printer".
If it prompts "Connection Failed", try repeatedly to click "Connection Test" until successful, if it keeps failing, restart the printer and
repeat this step.
2: Select "WiFi ", enter your WiFi network name in "SSID" and Mode with STA.
If your WiFi network has a password, choose "WPA-PSK/WPA2-PSK", Type with WPA2-PSK, enter your WiFi network password in "PSK key",
and then click "Set"
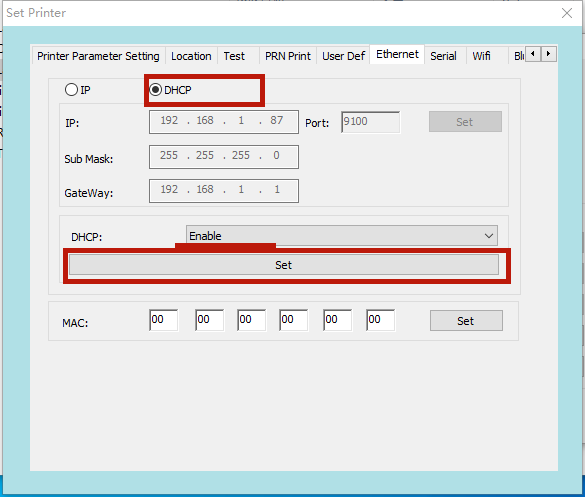
3: Select "Ethernet".
Option 1: Setup a fixed IP, choose IP and enter IP address, Sub Mask, GateWay information, choose Port: 9100, click "Set".
After setting, wait for the printer to beep twice (Once and then once again) to indicates that the printer was connected to the network.
How to get IP address, Sub Mask, GateWay information:
If you use Mac, go to System Preferences > Network > click " Advanced..." >You will find the IP address, Sub Mask, Gateway(router) info.
If you use Windows, go to Start > Settings > Network & internet > Wi-Fi and then select the Wi-Fi network you're connected to.
Under Properties, look for your IP address listed next to IPv4 address > You will find the IP address, Sub Mask, Gateway(router) info.
Note: Don't use the same IP address with your computer, just setup an IP address on the same network in the range of 2-200, like if your computer IP address with 192.168.0.110, then you can setup the IP address with 192.168.0.120. If the connection fails, it may be due to IP conflict, pls choose below Option 2 to setup.
Option 2: If you want to enable dhcp automatic allocation, select "DHCP", select "Enable", and then click "Set". If configuration is successful, it will print a [WiFi configure] label usually within 2 minutes.
1) Pls download the tool software first. www.rekdomprinter.com -> PRODUCTS -> Thermal Label Printer->
WU550 Wireless Label Printer -> DOWNLOADS-> Tool Software->
2)
Pls ensure the power off. Plug the power cord into the power adapter.
Plug the power adapter into the power interface on the back of the printer. Plug the other end of the power cord into a power outlet.
Connect the USB cable to your printer and plug the other end into your computer's USB port.
Then load the label in printer and turn the power on.
3) Pls check below steps:
Open tool software file ->Double click below tool column:
Pls click “WU550 Printer” and click "Connection Test", and it will show “Connection Successful”. Then click" Set Printer".
How to Print a Self Test: Once the printer is connected, press "Set Printer", pls Test -> click “ Self Test”
How to Disable the beeping: Once the printer is connected, press "Set Printer", pls User Default -> Beep: Disable -> click “ Set”
How to Restore factory settings: Once the printer is connected, press "Set Printer", pls User Default -> click “ Restore factory settings”
Note: After you done the Restore factory settings, it is equivalent to getting a new machine, you need to reset it again ( connect to WiFi again and install the wireless driver software again).
How to do Lack Paper Learn setting: Once the printer is connected, press "Set Printer", then Location ->Lack Paper Learn -> click “ Learn”.
Note: pls remember to remove your label paper from printer when you do this setting and turn the power on, i know the printer will beeping without labels, just keep it.
How to Update the firmware: Once the printer is connected, pls click “ Download” ->” Select Firmware” . We will supply firmware to our customers for update if need.
Ensure the power is off. Press and hold the paper feeder button and turn the power
on, release the button after the printer startup.
On Windows:
Go to “WU550 printer" ->Manage ->Printer Properties ->click “Print Test Page”. If you can print it, it means the driver software was installed correctly. You can also print a 4x6” sample label from our USB disk to verify.
On Mac:
Enter 127.0.0.1:631 on your browser->click “Printers” ->click "WU550 Printer" from Queue Name, Select “Print Test Page” from Maintenance. If you can print it, it means the driver software was installed correctly. You can also print a 4x6” sample label from our USB disk to verify.
There are some ways to printing amazon FNSKU labels.
Method 1 :
In Step 1 of your Send to Amazon workflow, click on Print all SKU labels
Step 2: Pls choose Thermal printing and if you use 2.25x1.25’’ label paper , pls enter 57mm as width and 31mm as height, then click print.
Pls download label instead of printing directly.
Then pls open label by Adobe reader and click printing.
Pls cloose WU550 Printer and pls choose 2.25x1.25’’ as paper size, then it will printing in perfectly!
Method 2:
In your Amazon Seller Central account, please click on Inventory > Manage FBA Shipments
Pls click Scan&Label
Pls click Printer Settings and enter the label size. like if you use 2.25x1.25’’ label paper, pls enter 57mm as width and 31mm as height, click Save.
Pls enter your product SKU and enter it,it will show like below:
Pls choose Download label. ( If print label directly, it will printing not correctly)
Pls open the label by Adobe reader and click printing.
Pls cloose WU550 Printer and pls choose 2.25x1.25’’ as paper size, then it will printing in perfectly!
Method 3:
In your Amazon Seller Central account, please click on Inventory > Manage FBA Inventory
Pls choose your product and click Edit and choose Print item labels.
Pls choose Print Item Labels and it will keep as PDF file .
Pls open the label by Adobe - Choose Edit -> Take a Snapshot - Select/Highlight the label's area -> Right click in the highlighted area and select Print (pls choose 2.25x1.25’’ as paper size) and pls use 2.25x1.25’’label paper, then it will be printing perfectly.
Pls check below video for a quick start:
By default, Some platforms produce labels in an 8.5 x 11 size at present which won't fit 4x6'' correctly. Like USPS, UPS, Mercari ...
If you print a few per day, we recommend our customers crop the label.
Like a USPS label from USPS website, choose PDF instead of Print Label > open with Adobe Reader > Choose Edit > Take a Snapshot > Select/Highlight the label's area > Right click in the highlighted area and select Print (choose 4x6'' as paper size), then it will be printed perfectly.
If you are printing many per day, we recommend our customers use shipping platforms like Shipstation or Shippo ...you can print 4x6'' label directly and get discounted shipping costs.
On the new eBay Interface, please choose 4" x 6" PDF as your label format.
Note: After you change your label size to 4x6'',only new labels will be created
in 4x6'' size. The previously label will still remain in the old size 8.5x11''. For the old
size 8.5x11'' label, pls open it with Adobe Reader - Choose Edit --> Take a
Snapshot - Select/Highlight the label's area - Right click in the highlighted
area and select Print (pls choose 4x6'' as paper size) and pls use
4x6" label paper,then it will be printing perfectly.
And when you get a new order and create the label to 4x6,it will be printing in 4x6".
If you use business Paypal account ,pls Login to PayPal and click the Gear
Icon - Select Account Settings - On the left hand side, please choose
Shipping - Under Shipping Preferences, click Update - -Under "U.S.PS ,"
click Edit printer settings - Pick Label Printer to one of the 4 x 6'' printers,
such as the "Zebra LP 2844-Z 4.0 x 6.0"
If you use personal paypal account , pls login to Paypal -> pls click on Shipping
Preference -> Pls select Label Printer to one of the 4x6'' label printer like Zebra
LP2844 -Z-4X6'' , then you can printing the label in 4x6'' .
Note: After you change your label size to 4x6'',only new labels will be created
in 4x6'' size. The previously label will still remain in the old size 8.5x11''.
For the old size 8.5x11'' label, pls open it with Adobe Reader - Choose Edit --> Take a
Snapshot - Select/Highlight the label's area - Right click in the highlighted
area and select Print (pls choose 4x6'' as paper size) and pls use
4x6" label paper,then it will be printing perfectly.
And when you get a new order and create the label to 4x6,it will be printing in 4x6''.
Pls Sign into Etsy.com -> Click Shop Manager -> Settings -> Shipping settings -> Shipping Label Options -> Select Format my labels for 4x6 Label printers.
Pls click on”Change format” and choose 4x6 instead of 8.5x11 Inch paper after you purchase a label on Shopify.
Click the "Print Label" button -> At the top of the popup, select the 4x6'' label format.
Pls check the links for the details:
https://support.pirateship.com/en/articles/2607130-mac-how-to-print-with-a-4x6-label-printer
https://support.pirateship.com/en/articles/2610080-windows-how-to-print-with-a-4x6-label-printer
Pls check the link for the details: https://www.youtube.com/watch?v=BKIrzCyanm0
To select your shipping label size, go to: Account Tab > My Seller tools > Shipping Label Settings > Please choose 4x6''. https://support.poshmark.com/s/article/945594407?language=en_US
Note: After you change your label size to 4x6'', only new labels will be created
in 4x6'' size. The previously label will still remain in the old size 8.5x11''. For the old
size label, pls open it with Adobe Reader -> Choose Edit -> Take a
Snapshot - Select/Highlight the label's area - Right click in the highlighted
area and select Print (pls choose 4x6'' as paper size), then it will be printing perfectly.
And when you get a new order and create the label to 4x6, it will be printing in 4x6".
To print your label from Shippo in a 4x6 size, clicking "Settings" -> "Labels" -> find the "Default label format" drop-down menu and choose "4x6 in PDF" -> then save your changes at the bottom of the page.
Note: After you change your label size to 4x6'', only new labels will be created
in 4x6'' size. The previously label will still remain in the standard size 8.5x11''.
For the standard size label, pls open it with Adobe Reader -> Choose Edit -> Take a Snapshot
-> Select/Highlight the label's area - Right click in the highlighted area and
select Print (pls choose 4x6'' as paper size), then it will be printing perfectly.
And when you get a new order and create the label to 4x6, it will be printing in 4x6".
Pls check the link for the details:
We have three ways to print UPS labels:
1.UPS provides free software called WorldShip. Please setup it for Labelrange.
After you installed LabelRange, please open UPS WorldShip and follow the steps below:
https://www.ups.com/assets/resources/webcontent/en_US/ThermalLabelInstall.pdf
2. We recommend customers to use shipping platforms like shippo, shipstation ... They connect to UPS.com and print
your label in a 4x6'' size directly and get the discounted cost.
3. If you definitely want to ship directly from UPS.com, You may leave the settings as default on UPS.com and download the label as PDF and then crop the label. To install the LabelRange as a UPS Thermal Printer has more limitations. It is
the UPS.com setting point, not the printer itself, other thermal printers has the same state, please kindly understand.